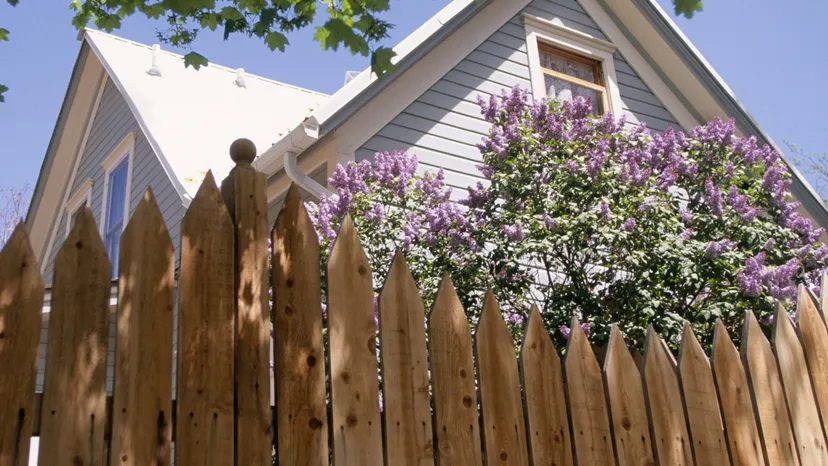
Sun. Wind. Rain. Snow. Frost. Your wood fence takes a beating. It doesn’t matter if it’s cedar, pine, or redwood. Nature punishes wood. Rot is the enemy. If you want a fence that lasts, you have to fight back with the right materials and smart installation.
Start with the post. This is the anchor. If your post is weak, your whole fence fails. You need a hole deep enough to handle the frost line. Fill the bottom with gravel for drainage. Then pour concrete. Set the post. Make sure it’s plumb. Stability isn’t a suggestion. It’s a requirement.
Lumber choice matters. Pressure-treated wood is soaked in preservatives. It lasts almost indefinitely, even underground. It’s expensive. Cedar and redwood are pricier still. But they resist rot naturally. Exterior paints work above ground. Below ground? Useless. Water kills paint. And water kills wood.
Check your fence annually. Look at the bottom of posts. Look at bottom rails. Look where boards meet the ground. Vegetation traps moisture. Trapped moisture breeds rot. Fix small problems now. One bad post pulls down the whole line.
We’re not rebuilding from scratch yet. We’re fixing. Minor repairs first. Then we’ll tackle rails. Then boards. Stay tuned.
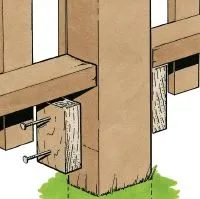
A loose rail is a common fence failure point. Whether you can save it depends on the rot at the joint. You can mend the break with a scrap 2×4 or metal T-braces. Sometimes you have to replace the entire rail. Here is how to do both.
Repairing a Loose Rail with a 2×4 Cleat
If the wood is salvageable, this method works. It is bulky but effective.
Step 1: Saturate the damaged area and a 2×4 scrap with wood preservative. Do this before you start. It stops the rot from spreading into the good wood.
Step 2: Level the rail. Fit a 2×4 snugly underneath it to act as a cleat. Nail this cleat to the post using galvanized nails. Drive a couple of nails down through the rail and into the cleat to lock it in place.
Step 3: Caulk the top and sides of the repair. This keeps moisture out. Water is the enemy here.
Using Metal T-Braces for a Cleaner Fix
Galvanized steel T-braces are available at most hardware stores. They are less conspicuous than a 2×4 block. They often last longer too.
Step 1: Level the rail. Drill pilot holes into both the post and the rail. This prevents splitting.
Step 2: Secure the T-braces to the rail with galvanized screws. Make sure they are tight.
Step 3: Caulk the joint. Prevent water ingress.
Step 4: Paint the T-braces. Match the fence color so they don’t stand out.
How to Replace an Entire Fence Section
Sometimes the rot is too advanced. You have to dismantle the section and rebuild it.
Step 1: Cut 2×4 rails to fit flat along the tops of the posts. They can span post to post or extend across two sections. Measure each rail individually. Fence post spacing varies slightly. Butt the ends of the rails tightly together. Start at one end of the fence line. Nail the rails in place with two 10d galvanized common nails at each end.
Step 2: Cut the 2×4 bottom rail to fit snugly between posts. Position it anywhere from slightly above grade level to 12 inches up. Nail it in place. Drive a 10d galvanized nail at an angle through the fence post and into the end of the rail on each side. Use a level to keep everything even.
Step 3: Measure and cut the fence boards. They need to be uniform in length. The length should equal the distance from the bottom of the bottom rail to the top of the top rail, measured at one of the posts.
Start at one end. Nail boards to one side of the rails. Leave a space equal to a single board width between each board. Secure each board with two 8d galvanized nails at the top and two at the bottom. Nail the tops first. Keep them flush. Then nail the bottoms. Pull or push the bottom rail into alignment as you go.
If your fence has boards on both sides, nail up all boards on one side first. Then nail alternate boards to the other side. Position these to cover the spaces left by the boards on the opposite side.
How to Replace Rotted Fence Screening
Replacing broken screening takes only a few hours. You just need basic carpentry skills.
Step 1: Measure an unbroken piece nearby. Get the correct length and width for the new piece. Use lumber that matches the old screening width. If it doesn’t match, rip boards to the proper width with a handsaw or power saw. Check all cuts with a carpenters’ square.
Step 2: If you are replacing pickets or curve-top screening, set a cut board against an unbroken picket. Trace the top onto the new board. Cut these curves with a saber, coping, or keyhole saw. If the fence is painted, apply a coat of top-quality exterior primer. For natural wood, stain the new boards to match.
Step 3: Remove the broken pieces. Hammer and pry them away from the rails. Pull out any old nails.
Step 4: Set the new board or picket against the rails. Align it carefully. Nail it firmly into place with galvanized 8d nails.
Step 5: Paint or stain the new pieces to match the rest of the fence.
Repairing Fence Posts
When posts go bad, the whole structure wobbles. It is harder to fix than rails. But it is not impossible. You often need to dig out the old concrete and set new posts in fresh concrete. Or, you can sister new wood alongside the rotted post if the rot is only at the base.
“A fence is only as strong as its posts.”
If the post is rotten at ground level, you might get away with burying a pressure-treated 4×4 alongside the existing one. Bolt them together. Then rebuild the rails. But if the post is crumbling above ground, you are likely looking at a full replacement. That involves digging, setting, and waiting for concrete to cure. It is more work. But it secures the whole line.
Stabilizing Loose Fence Posts
Wobbling is a symptom, not the disease. You need to diagnose the structural failure before you start swinging a hammer.
If the wood itself is compromised—rotted through or snapped—the fix depends on the severity. Minor decay might be salvageable with splints. Total failure means replacement is the only real option.
But what if the wood looks fine?
Often, the timber is sound, but the connection to the earth has failed. The post has pulled loose from its hole. In this case, you have two paths: stakes or concrete.
Stakes are a quick patch. Concrete is a permanent fix.
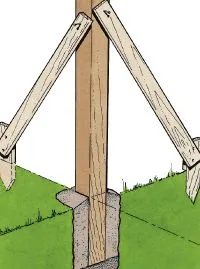
How to Brace a Loose Post
If you choose the stakes route, material choice matters. Do not use standard pine.
1. Select the right lumber
You need 2x4s. They must be long enough to go below your local frost line and extend at least 18 inches above ground.
Use only:
* Pressure-treated lumber
* Cedar
* Clear all-heart redwood
Anything else will rot out before the stakes do.
2. Install the stakes
Bevel cut one end of each 2×4. This makes driving them into hard soil easier.
Drive them into the ground on opposite sides of the post. They act as anchors, pulling back against the wobble.
3. Bolt it down
You need to connect these stakes to the post. Bore two holes through both 2x4s and the post simultaneously.
Use galvanized carriage bolts. Regular screws will strip or rust out too quickly. The bolts provide the tensile strength needed to hold the structure steady.
Pouring a New Concrete Base
Stakes are temporary. If you want the wobble to stay gone, dig out around the post.
Plumb the post using temporary braces. Get it straight.
Prepare premixed concrete. Stir it well. Dry mix creates weak points.
Pour it into the hole around the base.
Here is the trick most people miss: slice the concrete mix periodically with a spade as you pour. This eliminates air pockets. Air pockets are voids. Voids mean weak spots. Weak spots mean the post wobbles again in two years.
At the top of the hole, mound the concrete. Slope it away from the post. You want water to shed, not pool against the wood. Water is the enemy of every wooden structure.
Repairing Fence Gates
Now that the posts are solid, you can look at the gate.
A gate that drags in the dirt or won’t latch shut is more than an eyesore. It’s a safety hazard and a frustration. Before you call a contractor, check the hinges. Bent hinges are common culprits. Replace them with a heavier-duty type immediately.
If the screws are pulling loose from the wood, don’t just tighten them. They won’t hold. Remove the screws and plug the stripped holes. Glue in short pieces of dowel to fill the void.
Once the glue dries, drill new pilot holes. Install longer screws or carriage bolts. Use only galvanized steel hardware. Rust will destroy your repair job within a year.
Shimming to Lift a Sagging Gate
For a gate that sags only slightly, shimming is a quick fix. Prop the gate open to relieve tension. Remove the screws from the post side of the lower hinge.
Cut a thin piece of cedar shake to fit into the hinge mortise. This shim lifts the gate slightly. Reattach the hinge by driving longer screws through the shim and into the post. The gate should now hang level.
Squaring a Misaligned Gate
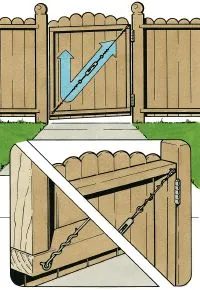
Sometimes the gate frame itself is out of square. The weight of the wood pulls it out of alignment with the fence line. You can fix this with a turnbuckle.
Drive a screw eye into the upper corner of the gate on the hinge side. Place another screw eye in the lower corner on the latch side.
Run wire and a heavy-duty turnbuckle from one eye to the other. Tighten the turnbuckle until the gate frame is square. Test the latch. It should engage smoothly.
If your fence is beyond repair, replacement might be the only option.
When to Build a New Wood Fence
What if your fence is beyond repair? You need a new one. Building a wood fence is a manageable DIY project.
Start by planning the layout. Measure the perimeter. Account for corners and gates. Choose a material that suits your climate. Pressure-treated pine is a standard choice. Cedar lasts longer but costs more.
Prepare the ground. Dig post holes at least two feet deep. Set the posts in concrete. Let the concrete cure fully before attaching rails.
Attach rails to the posts. Then add pickets or boards. Stain or seal the wood to protect it from moisture.
This is just the beginning. A solid fence starts with proper installation. Take your time with the foundation. The rest follows.
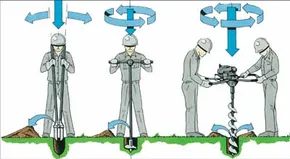
Digging post holes is the most physically demanding part of building a fence. You need a posthole digger. Hand-operated clamshell and auger diggers work fine in sandy, rock-free soil. If your soil is rocky or you have a lot of holes to dig, rent a power-driven auger.
For best results, use pressure-treated, ground-contact lumber, cedar, or redwood. With the latter, no finishing is necessary; the fence can be left to weather naturally. If you must, you can use untreated wood for screening and top rails, and for bottom rails that are at least four inches above the ground.
You’ll need 4x4s for fence posts, 2x4s for rails, and 1x4s or 1x6s for screening. To build a fence:
Setting the First Post
Step 1: Lay out the approximate fence line, making sure you’re not on your neighbor’s property.
Step 2: Establish the exact location of the first end or corner post. Dig a hole there that’s 18 to 24 inches deep. For a fence that’s five or six feet high, dig down 24 inches.
Using Concrete for Stability
Step 3: Pour about three inches of gravel into the bottom of the hole to improve drainage, then set the post into the hole.
Step 4: Level the post. Then brace it in two directions with wooden stakes.
Step 5: Prepare premixed concrete, stir it well, and pour it into the hole around the post. Slice the concrete mix periodically with a spade as you pour to eliminate any air pockets. At the top of the hole, mound concrete around the base of the post to shed water.
“Only end, corner, and gate posts need to be set in concrete.”
Positioning Subsequent Posts
Step 6: After the first post is set, determine exactly where you want the opposite end or corner post. Set this post the same way you set the first one. Only end, corner, and gate posts need to be set in concrete. Intermediate posts usually can be set in soil.
Establishing the Guide Line
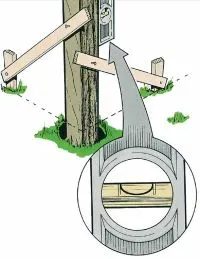
Start by verifying your end posts sit at the exact same height above the ground. Drive a nail partway into each one, pointing toward the fence line, just above grade. Tie a length of twine between them. This string becomes your laser guide for spacing.
Drive stakes into the ground along the twine to mark where intermediate posts go. Most fences use eight or ten-foot intervals. Once the stakes are set, pull the string and nails away.
Digging and Setting the Posts
Dig the holes for those intermediate posts. Dump about three inches of gravel into the bottom of each. Set a post in place. Check the height against your string guide. If a post sits too high or low, adjust it by adding more gravel or shim it up with small stones.
Plumb every post. It must be perfectly vertical. Fill six inches of gravel around the base to lock it in. Then fill the rest with soil. Add soil in four-inch layers. Compact each layer with a piece of scrap 2×4.
Installing the Rails
Cut 2×4 rails to fit the space between posts. They can span one section or two. Measure and cut each individually to account for tiny spacing errors. Butt the ends tight.
Start at one end. Nail the rails flat against the tops of the posts. Use two 10d galvanized common nails at each end.
Next, fit a 2×4 bottom rail between each pair of posts. Position it flat, anywhere from just above ground to 12 inches up. Toenail it with a 10d galvanized nail through the post and into the rail on both sides. Use a level to keep everything even.
Nailing the Boards
Measure and cut your fence boards. They need to be uniform. Cut them to the distance from the bottom of the bottom rail to the top of the top rail. Measure at one post and stick to that length.
Start at one end. Nail the boards to one side of the rails. Leave a gap between each board equal to the width of one board. Use a board as a spacer to keep the gaps consistent.
Secure each board with two 8d galvanized nails at the top and two at the bottom. Nail the top first. Keep it flush. Then nail the bottom. Pull or push the bottom rail into alignment as you go.
If you are building a double-sided fence, finish one side completely. Then nail alternate boards to the other side. This covers the gaps left on the first side.
You now have the complete picture. Minor repairs or a total rebuild are within reach.
Frequently Asked Questions
What types of wood are best for a long-lasting fence?
Cedar and redwood are ideal. They resist rot and decay naturally. No chemical treatment is needed.
How often should a wood fence be stained or sealed?
Stain or seal every two to three years. This protects against weathering. It maintains the look.
Lots More Information
Related HowStuffWorks Articles
-
Painting Exteriors
-
How To Repair a Leaky Roof
-
Low-Maintenance Garden