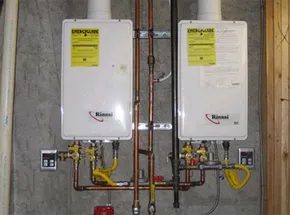
Your gas water heater relies on a tiny, often overlooked component to keep you from freezing or burning down your house. It’s called the pilot light. That small blue flame has one job: ignite the main burner when the tank gets cold. But there’s a catch. If that flame goes out, you don’t want gas continuing to flow into the chamber. That’s where the thermocouple comes in.
It sits right next to the pilot flame. A small metallic tube. You might be wondering how does a thermocouple work inside that assembly? It’s not magic. It’s physics. And if it fails, your water heater stops working.
The Safety Shut-Off Mechanism
Think of the thermocouple as a safety guard. Its primary job isn’t measuring temperature for your comfort. It’s monitoring the pilot light for survival.
When the pilot is lit, the thermocouple generates a small electrical current. This current tells the gas valve to stay open. Gas flows. Flame burns. Hot water. Simple.
If the pilot light dies, the thermocouple cools down. The current stops. The gas valve snaps shut. No more gas. No explosion. Just a cold shower until you fix it.
If the thermocouple stops working, that signal breaks. The valve thinks the pilot is out. It cuts the gas. The burner won’t fire. You’re left with no hot water and a confused homeowner.
We’re not just explaining the science here. We’re showing you how to test this part. And if it’s bad, how to swap it out.
The Seebeck Effect Simplified
A thermocouple is deceptively simple. Two different metal wires joined at one end. That’s it.
When you heat that junction, something called the Seebeck effect happens. The metals react differently to the heat. This creates a tiny voltage. The hotter the junction gets, the higher the voltage.
This voltage is directly related to the temperature difference between the heated end and the cool end. By measuring that voltage, you know the temperature.
It’s robust. It responds fast. It handles extremes. You can stick a thermocouple in a furnace or a freezer. It won’t break easily. Other sensors might fry or freeze. Not this one.
Hot Junction vs. Cold Junction
Let’s break down the anatomy.
The Hot Junction: This is where the two wires are fused. This end sits in the pilot flame. It does the measuring. It gets hot.
The Cold Junction: These are the open ends of the wires. They connect to the gas valve. Despite the name “cold,” this end doesn’t have to be frozen. It just needs to be the reference point. It’s the end connected to the measurement device.
Why does this matter? You need a reference temperature to calculate the actual temperature at the hot end. The voltage generated depends on the difference between the two ends. If you don’t know the temperature at the cold junction, your reading is useless.
Most systems assume a stable ambient temperature at the valve. This allows the system to calculate the hot junction’s temperature accurately. It’s a clever bit of engineering that keeps things safe.
Where You’ll Find Thermocouples
These things are everywhere. You just don’t see them.
Industrial Settings
Factories use them constantly. Furnaces. Kilns. Reactors. They withstand abuse. High heat. Vibration. Dust. They keep processes running safely. If a reactor overheats, the thermocouple catches it. It’s a critical safety layer.
Household Appliances
Your oven has one. Your gas stove has one. Your water heater has one. They regulate temperature. They ensure safety. They respond quickly to changes. When you turn up the dial, they help the appliance react.
Scientific Research
Scientists need precision. Thermocouples provide it. From basic lab experiments to advanced studies, they measure temperature gradients accurately. They’re versatile. They fit into tight spaces. They give reliable data.
Automotive Use
Cars use them too. Exhaust gas temperature monitoring. Engine performance tracking. Optimizing efficiency. Reducing emissions. Thermocouples help engines run cleaner. They’re part of the modern vehicle’s management system.
Why You’d Choose a Thermocouple
They’re cheap. They’re durable. They work.
The ability to measure a wide range of temperatures is a huge plus. Extreme cold to intense heat. No problem.
In industrial and automotive contexts, they take a beating. They don’t care about harsh conditions. They’re simple devices. That simplicity makes them popular. When things go wrong in a factory, you want a sensor that won’t fail first.
Where They Fall Short
It’s not all good news.
Accuracy isn’t their strongest suit. Compared to other sensors, they can be less precise. The output isn’t linear. Voltage doesn’t scale perfectly with temperature. You have to calibrate. You need complex electronics to interpret the data correctly.
In some applications, that non-linearity is a headache. It requires extra processing. For high-precision needs, other sensors might be better. But for safety and durability? Thermocouples are hard to beat.
Testing Your Water Heater Thermocouple
So, your hot water is cold. The pilot light is out. Or it keeps going out. You suspect the thermocouple.
Here’s how to check it.
- Turn off the gas. Safety first. Always.
- Access the valve. Remove the access panel. Locate the gas valve and the thermocouple. It’s the thin copper tube ending near the pilot flame.
- Disconnect the wire. Unhook the thermocouple from the gas valve.
- Use a multimeter. Set it to millivolts (mV). Connect the probes to the thermocouple’s terminals.
- Light the pilot. Use a long match or lighter. Hold the flame on the thermocouple tip.
- Read the voltage. A healthy thermocouple should produce between 25 and 30 millivolts. Anything lower? It’s failing. Replace it.
If the voltage is low, the gas valve won’t stay open. The pilot will die. You’ll have no heat.
Replacing it is straightforward. Buy a matching part. Disconnect the old one. Screw in the new one. Reconnect the wire. Light the pilot. Check the flame. You’re done.
It’s a small part. But it keeps the big machine running. Or keeps it from becoming a hazard.
Next time, we’ll look at the step-by-step replacement process in detail. You’ll need a wrench. And some patience.
Why Your Water Heater Pilot Light Won’t Stay Lit
Most homeowners don’t give their water heater much thought until it fails. But inside that metal tank, a simple safety device called a thermocouple does the heavy lifting. It sounds complicated, but it’s just two wires. Understanding how it works can save you a service call.
The thermocouple is the probe sticking into your pilot flame. It’s made of two dissimilar metals joined together. When that pilot light burns, the heat hits the tip. The metals react to the temperature change. This reaction creates a tiny electrical current. That current is all you need. It keeps the gas valve open. If the current stops, the valve shuts off.
Think of it as a thermal switch. No electricity required. Just heat.
The Safety Mechanism That Prevents Gas Leaks
This isn’t just about keeping your water hot. It’s about stopping a disaster. If the pilot light blows out, the thermocouple cools down. The current drops to zero. The gas valve snaps shut.
Without this mechanism, gas would keep flowing into your tank. Unburned gas is dangerous. It’s explosive. The thermocouple prevents that. It’s passive. It needs no power source. It just sits there, watching the flame.
When the flame goes out, the temperature drops. The current fades. The valve closes. This automatic response is critical. It protects your home from potential leaks.
How to Test a Thermocouple on a Gas Valve
You can test this yourself. You don’t need a multimeter for the basic check. You just need to watch the pilot light.
Follow these steps to diagnose a faulty thermocouple :
- Turn off the gas to the water heater. Wait for the area to ventilate.
- Light the pilot. Hold down the pilot button on the gas control valve.
- Keep holding the button for 30 to 60 seconds after the pilot ignites. This allows the thermocouple to heat up and generate current.
- Release the button slowly.
Watch the flame. If the pilot stays lit, the thermocouple is likely working. The current is holding the valve open.
If the pilot light goes out immediately, the thermocouple is probably defective. It’s not generating enough current. The valve thinks there is no flame. It shuts off the gas as a safety precaution.
If you can’t light the pilot at all, the problem isn’t the thermocouple. Check the gas supply. Look at the gas control valve. The issue is there.
This simple test saves time. You don’t need to guess. Just watch the flame. If it dies, replace the thermocouple. It’s an inexpensive part. It’s easy to install. And it’s the reason your gas heater doesn’t become a hazard.
Keep your hands off the gas line. Use a wrench to tighten the connection. Wear gloves. Safety first.
The pilot light is your visual cue. Trust it.